本文共 4016 字,大约阅读时间需要 13 分钟。

poi 合并单元格添加边框

Adding a bit of extra padding to your cell boundaries can make it easier for you to read through data in a Microsoft Excel spreadsheet. If you want to add extra white space between text and cell borders, here’s how.
在单元格边界上添加一些额外的填充可以使您更轻松地阅读Microsoft Excel电子表格中的数据。 如果要在文本和单元格边框之间添加额外的空白,请按照以下步骤操作。
在左右单元格边界之间添加额外的间距 (Adding Extra Spacing Between Left and Right Cell Borders)
To add the extra space you need between the borders of a cell and the data held within it, you’ll need to align your text or numbers using an indent. Formatting your cells to do this will give you an extra gap between your cell border and the start of your data.
要在单元格的边框和其中的数据之间添加所需的额外空间,您需要使用缩进对齐文本或数字。 格式化单元格来执行此操作将使您在单元格边界和数据开始之间留出额外的空隙。
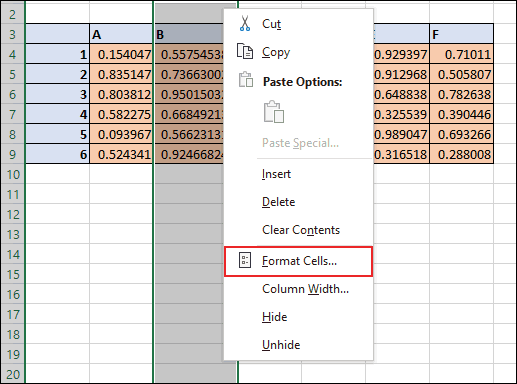
To start, open your Excel spreadsheet and select the cells you want to format. Right-click on the cells you’ve selected and then click the “Format Cells” button.
首先,打开Excel电子表格,然后选择要设置格式的单元格。 右键单击所选的单元格,然后单击“设置单元格格式”按钮。
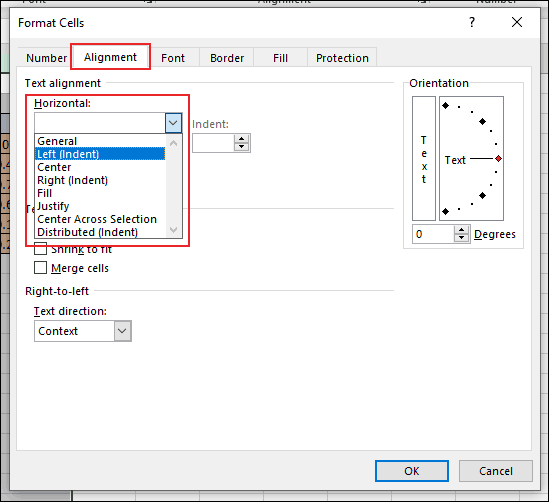
This opens the “Format Cells” options box. From here, you can edit everything from your cell number type to the font style. Click on the “Alignment” tab and then open the “Horizontal” drop-down menu in the “Text Alignment” section.
这将打开“格式化单元格”选项框。 在这里,您可以编辑所有内容,从单元格编号类型到字体样式。 单击“对齐方式”选项卡,然后在“文本对齐方式”部分中打开“水平”下拉菜单。
For extra space between cell text and the left or right cell border, click “Left (Indent)” or “Right (Indent).” Click “Distributed (Indent)” to have equal spacing between both the text and the cell borders on both sides.
要在单元格文本与单元格的左侧或右侧边框之间留出多余的空间,请单击“左(缩进)”或“右(缩进)”。 单击“分布式(缩进)”以使文本和两侧的单元格边框之间具有相等的间距。
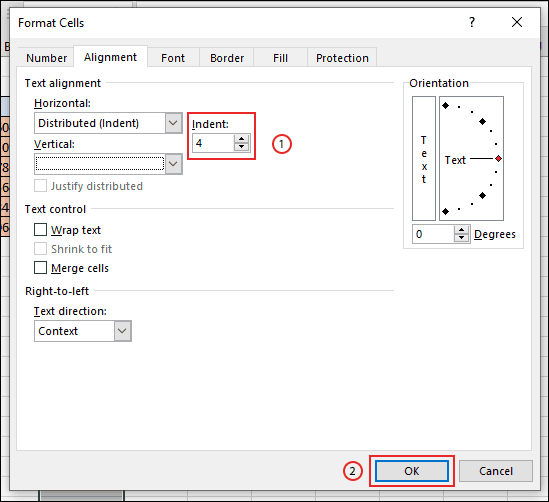
In the “Indent” box, select the size of your additional spacing. Click the up and down arrows or type a number in the box.
在“缩进”框中,选择其他间距的大小。 单击上下箭头,或在框中键入数字。
Once you’re ready, click the “OK” button to save any changes.
准备就绪后,单击“确定”按钮以保存所有更改。
The additional padding between your text and cell borders will be applied to your selected cell range.
文本和单元格边框之间的其他填充将应用于您选择的单元格范围。
In the example below, we’ve applied a distributed indent to the cell borders in column B, using four spaces, to allow for equal padding between the cell text and the left and right cell borders.
在下面的示例中,我们使用四个空格对B列中的单元格边框应用了分布式缩进,以允许单元格文本与左右单元格边框之间的填充相同。

With this cell formatting applied, the cell values keep the extra padded boundaries against the cell borders, even if you change the width of the column manually.
应用此单元格格式后,即使您手动更改列的宽度,单元格值也会保留额外填充的边界和单元格边界。
在顶部和底部单元格边界之间添加额外的间距 (Adding Extra Spacing Between Top and Bottom Cell Borders)
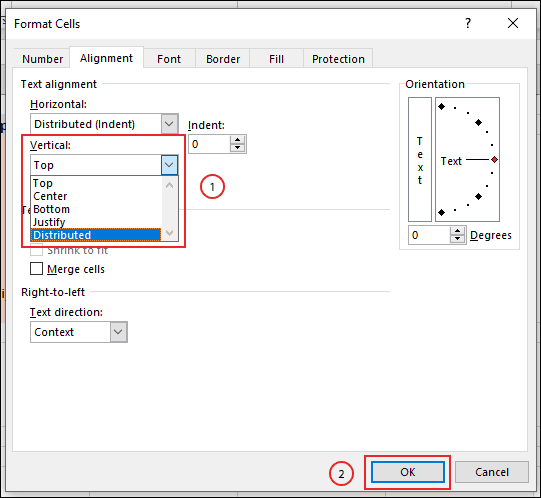
If you want to add extra spacing between your text and the top and bottom cell borders, you can also do this from within the “Format Cells” options box. As before, select your cell range within the spreadsheet, right-click on the selection, and then click “Format Cells.” In the “Alignment” tab, click on the “Vertical” drop-down menu.
如果要在文本与顶部和底部单元格边框之间添加额外的间距,也可以在“设置单元格格式”选项框中执行此操作。 和以前一样,在电子表格中选择单元格范围,右键单击所选内容,然后单击“设置单元格格式”。 在“对齐”选项卡中,单击“垂直”下拉菜单。
Select “Top” to align your cell data to the top of your cell, “Center” to ensure an equal gap between the top and the bottom, or “Bottom” to align your text to the bottom of your cell.
选择“顶部”将单元格数据与单元格的顶部对齐,选择“居中”以确保顶部和底部之间的间距相等,或者选择“底部”以使文本与单元格的底部对齐。
Click “OK” to apply the new formatting to your cells.
单击“确定”以将新格式应用于您的单元格。
Depending on the option you’ve chosen, your cell data will now be aligned to your chosen option. If you’ve chosen to use the “Center” option, this will align your text to the middle of the cell. You can see this in action by to allow for a “taller” row.
现在,根据您选择的选项,您的单元格数据将与您选择的选项对齐。 如果您选择使用“居中”选项,这将使文本与单元格的中间对齐。 您可以通过以允许“更详细”的行来查看实际情况。
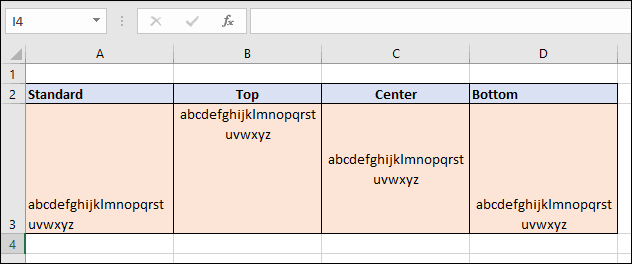
In the example below, each of these options has been used with a string of text containing the alphabet.
在下面的示例中,这些选项中的每一个都与包含字母的文本字符串一起使用。
You can combine horizontal and vertical text alignment for your cells if you’d prefer. This allows you to apply additional spacing between your cell data and each of your cell borders.
如果愿意,可以将单元格的水平和垂直文本对齐方式组合在一起。 这使您可以在单元格数据和每个单元格边界之间应用额外的间距。
翻译自:
poi 合并单元格添加边框
转载地址:http://ahfwd.baihongyu.com/